STEPS TO IMPROVE YOUR WEBSITE PAGE SPEED CHAPTER 3
This step is highly important as it entails optimizing webpage speed performance techniques.
You will need to get most work done on your server-side to make this chapter work for you.
- You need to set your server cache on (contact your host for this).
- You need to increase your server speed (contact your host for this).
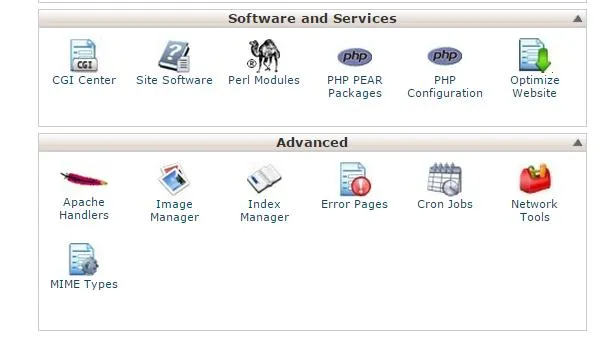
- You need to set up your gzip via your Cpanel, this will let you compress all output files from your server. Log into your Cpanel and go to software and services and click on optimize the website, next you select the compress all content and hit update settings.
- You need to set your cache browser to leverage caching with the use of your .htaccess file
Open the file and place the codes in it.
## EXPIRES CACHING ##
ExpiresActive On

ExpiresByType image/jpg "access 1 year"

ExpiresByType image/jpeg "access 1 year"

ExpiresByType image/gif "access 1 year"

ExpiresByType image/png "access 1 year"

ExpiresByType text/css "access 1 month"

ExpiresByType application/pdf "access 1 month"

ExpiresByType text/x-javascript "access 1 month"

ExpiresByType application/x-shockwave-flash "access 1 month"

ExpiresByType image/x-icon "access 1 year"

ExpiresDefault "access 2 days"
## EXPIRES CACHING ##
By using this code, our main static files (images, CSS, PDFs, JS, etc.) will be cached in order to produce faster loading times in the future.
By using this step you have also identified the expiration span for your files.
Turn off ETags
By removing the ETag header, you disable caches and browsers from being able to validate files, so they are forced to rely on your Cache-Control and Expires header.
Entity tags (ETags) are a mechanism to check for a newer version of a cached file.
Add these lines to .htaccess:
Header unset ETag
FileETag None
Remove Last-Modified header
If you remove the Last-Modified and ETag header, you will totally eliminate If-Modified-Since and If-None-Match requests and their 304 Not Modified responses, so a file will stay cached without checking for updates until the Expires header indicates new content is available!
Add these lines to .htaccess:
Header unset Last-Modified
- You will need to get installed on your server Google’s Modpagespeed more information can be gotten via PageSpeed Module for Nginx
It is basically a set of filters that run at the webserver level after your web backend has finished generating the markup. It will optimize the markup to web best practices as well as optimize the delivery of assets for bandwidth savings and speed. For example, it can rescale images to a size requested by the markup via height/width tags, performing a lossless compression, delivering WEBP images to browsers that support them. It can also combine javascript files and make them non-blocking + minify. The main advantage being this is all a process that can run entirely separately from your development flow meaning you can still upload unminified CSS to your web server and not have to worry about manually combining files together for speed. To Install I had to recompile Nginx with the page speed module(Instructions here).
Or if you have a nice host provider like mine you could shoot them an email to help you install the modules on your server.
There are filters for each of the different options and match fairly closely to the issues that the PageSpeed Insights tool will give you. The complete list of filters is all documented but the config below is what worked for me to achieve a 100% speed ranking with the PageSpeed Insights tool.
The tool runs in the background so not every rule will be satisfied on the first-page load with the new config turned on. Some processes such as the recompression of images and fetching/inlining of CSS scripts will only be served to the browser once the external process has been completed. It would be a bit of an anti-pattern for a page speed module to make a request slower whilst it finishes its compression.
- Lastly, you will need a CDN I prefer Cloudflare as they provide a free basic package that is suitable for any webpage, you can try the premiums for more advanced options. A content delivery network (CDN) is a system of distributed servers (network) that deliver webpages and other Web content to a user based on the geographic locations of the user, the origin of the webpage, and a content delivery server.
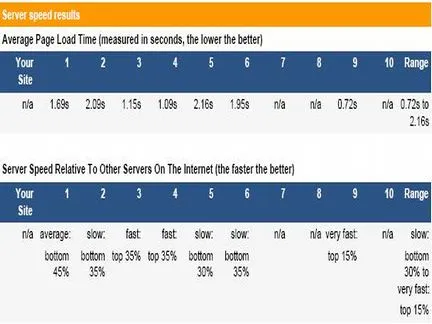
This sums it all up for our topic on how to optimize webpage speed performance, now the next thing to look at is our case study using our site as an example.