
2022-02-18 | 2135 ![]() Print
Print ![]() PDF
PDF
Web spammers are one threat to building a safe email list or receiving quality contact messages from your website, this is why the introduction of ReCaptcha to try and minimize the bizarre rage of spamming activity online, with most goals are on penetrating your server weaknesses. This has brought my attention to the need of installing Google Recaptcha v3 on our web pages, but the dilemma here is that we have two forms on the same page, so how to go about this?

First of all, I do prefer the Google ReCaptcha v3 better than ReCaptcha v2 as it is easy to integrate or add to your forms in PHP or HTML and does not interrupt the submission process of your web visitors submission on your web page.
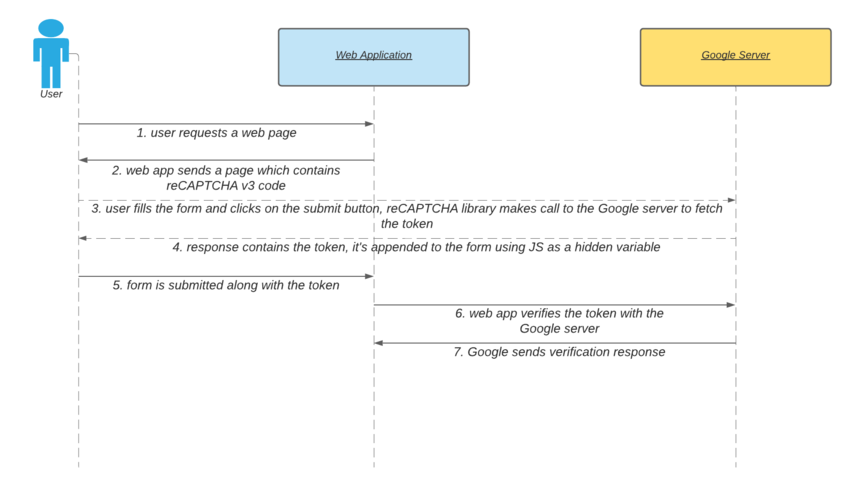
But first, it is fair we explain the concept of what ReCaptcha does, using the image illustration below we can identify the structural path which your users go through behind the scene when their submissions are being verified via Google ReCaptcha.

image illustration courtes: https://code.tutsplus.com/
Let’s try to understand the overall flow in detail:
{
  "success": true|false,      // whether this request was a valid reCAPTCHA token for your site
  "score": number             // the score for this request (0.0 - 1.0)
  "action": string            // the action name for this request (important to verify)
  "challenge_ts": timestamp,  // timestamp of the challenge load (ISO format yyyy-MM-dd'T'HH:mm:ssZZ)
  "hostname": string,         // the hostname of the site where the reCAPTCHA was solved
  "error-codes": [...]        // optional
}
In other, for us to grant a safe method to process our contact form we will need to follow these three steps. We need our response score to be greater than 0.5, and the success property should be TRUE. Along with this, we need to compare the response action value with the value of the action hidden variable which is submitted alongside the form.
It is important to note reCAPTCHA v3 API returns a score for each submission request without user friction. The response score which you get is based on the user's interactions with your site— their keypresses and mouse movements. The reCAPTCHA v3 learns from the real traffic on your website. So it may be that the scores are different in different environments. As a starting point, you can use a threshold of 0.5, and you could adjust it later on as per your requirements.
Ok, so now we are done with our explanation, it is time to get to the fun part on how to integrate your ReCaptcha v3 on your contact form.
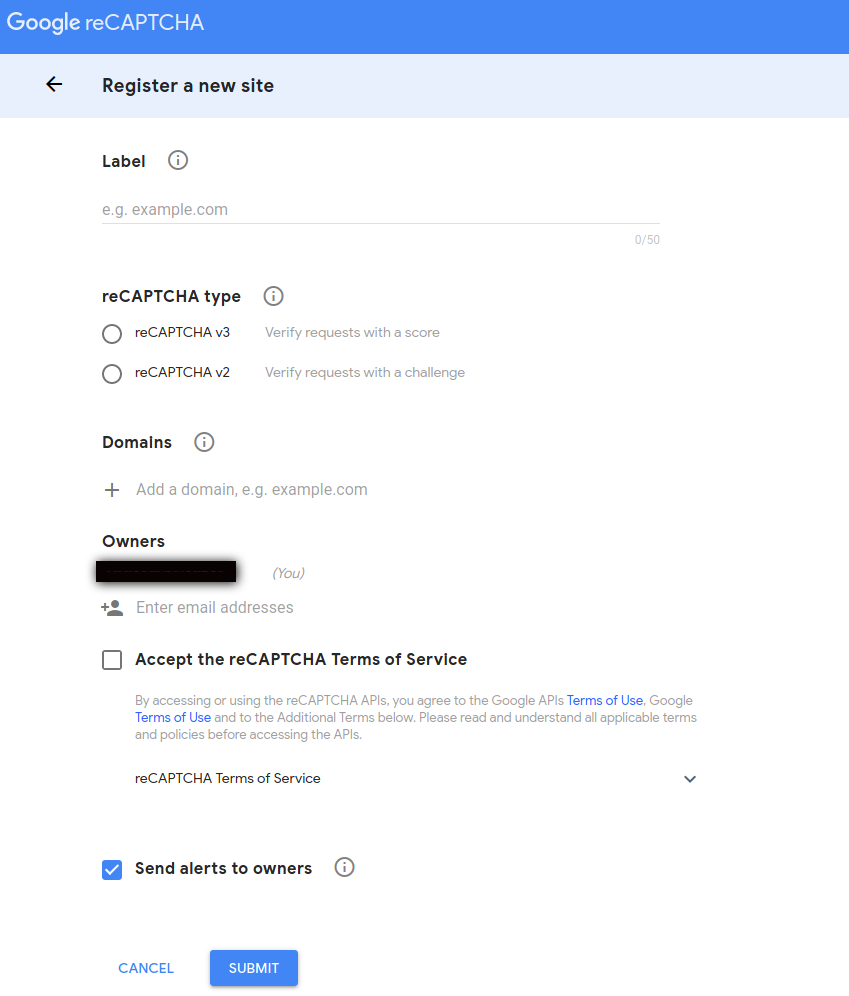
First, you need to log in to Recaptcha, register your domain, and then get both your site secret and public keys, they will come in handy in our next step.

In the reCAPTCHA Type field, select the reCAPTCHA v3 option. Fill in the Domains and Owners information as needed. Next, read and accept the reCAPTCHA Terms of Service. Finally, click on the Submit button to save the settings.
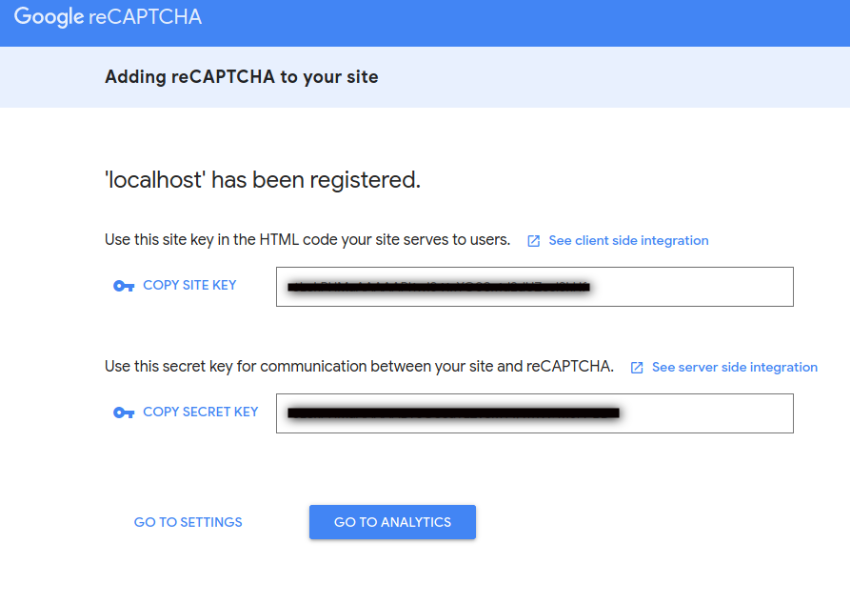
Upon form submission, Google generates a site key and site secret for your domain which you will copy and use in our installation process.

Now that we have done the basic step the next part is how to add it to our contact form, this method is only useful for a single page that has a contact form on it.
You will require two pages, one to process and validate your form submission data and the one that carries the form itself.
Your form page will be the one on your web page "form.php" for illustration
While the processing file will be named "processing.php" for illustration
Go ahead and create the form.php file with the following contents.
<form id="newsletterForm" action="form.php" method="post">
      <div>
          <div>
              <input type="email" id="email" name="email">
          </div>
          <div>
              <input type="submit" value="submit">
          </div>
      </div>
    </form>
For Google to identify your form it needs to call via your site key, and the next step is to create our processing.php and have Google Recaptcha validate prior to the processing.php form validating the data.
Go ahead and create the processing.php file with the following code to handle the form submission.
  RECAPTCHA_V3_SECRET_KEY, 'response' => $token)));
curl_setopt($ch, CURLOPT_RETURNTRANSFER, true);
$response = curl_exec($ch);
curl_close($ch);
$arrResponse = json_decode($response, true);

// verify the response
if($arrResponse["success"] == '1' && $arrResponse["action"] == $action && $arrResponse["score"] >= 0.5) {
    // valid submission
    // go ahead and do necessary stuff
} else {
    // spam submission
    // show error message
}
With these two forms in place, you should get a token response after submission, which is very important to validate and score each submission process on your website also your secret key is being passed across with the token, to achieve this you need to make a POST request to Google ReCaptcha server to verify the process
via https://www.google.com/recaptcha/api/siteverify
In our example above PHP cURL was used to make a POST request, you can use other methods that you are more familiar with.
As a response, you’ll get a JSON object which contains the necessary information that you can use to verify. As discussed earlier, you should at least check three things to make sure the form is submitted by a human: success, action, and score.
Now that we have explained how to add reCaptcha v3 on a form, I think we should talk about how to install ReCaptcha on multiple forms on a single page.
Currently, our website has got two forms, one is hidden and the other is visible, the hidden form is for pop-up windows that are attached to certain posts and can be used for capturing page visitors' email and names. While the other form is basically for our RSS subscription, where you can easily build your readership and get them notified via email whenever you publish a new post.
Apparently, our earlier illustration above will not follow so we need to devise another means or approach to this.

we are not going to repeat some steps already explained earlier above, so I will assume you already have your APIs (secret and public Keys).
2- Add the following PHP code to the header, add PHP before the first "?" :
 ?
define (SITE_KEY, 6LfDk6gZAAAAAG...........................);
define (SECRET_KEY, 6LfDk6gZAAAAAHg........................);
?
3- Add the following script to the footer section :
grecaptcha.ready(function () {
        grecaptcha.execute('', {action: 'forms'}).then(function (token) {
            var recaptchaElements = document.getElementsByName('g-recaptcha-response');
            for (var i = 0; i < recaptchaElements.length; i++) {
                recaptchaElements[i].value = token;
            }
        });
    });
4- Add the following line of PHP code before the ending form tag
input type="hidden" name="g-recaptcha-response" id="g-recaptcha-response"
To test your answer from the google server you can add the following code where you have the form :
php

if ($_POST) {
    // Build POST request:
    $recaptcha_url = 'https://www.google.com/recaptcha/api/siteverify';
    $recaptcha_response = $_POST['g-recaptcha-response'];
    // Make and decode POST request:
    $recaptcha = file_get_contents($recaptcha_url.'?secret='.SECRET_KEY.'&response='.$recaptcha_response);
    $recaptcha = json_decode($recaptcha);

        // Take action based on the score returned:
        if ($recaptcha->score >= 0.5) {
        // If the score is equal to or better than 0.5 , you have a good answer
         echo 'Successfull';
        } else {
        // otherwise, you can send the spammer to other address
        //header('Location: spam.htm');
        echo 'not Successfull';
        exit();
        }
}
That is it folks we are all done and set to use ur reCaptcha on mutliple forms on a single page.

I am a seo web analyst and have a love for anything online marketing. Have been able to perform researches using the built up internet marketing tool; seo web analyst as a case study and will be using the web marketing tool (platform).
How To Fix GA4 Showing Wrong Domain Traffic
How To Reactivate Google Adsense Account
How Do You Write Pitch Deck That Wins Investors
Effective Lead Magnet Funnel Examples For Businesses
How To Promote FMCG Products Using Digital Marketing
The Main Objectives Of SEO in Digital Marketing
How Artificial Intelligence Is Transforming Digital Marketing
Google CEO Sundar Pichai: Search will profoundly change in 2025
3 Most Important Business Growth Strategies
Top 20 Work From Home Job Skills